
Table of Contents
How to Program a Hobbywing ESC without Card
How to Program your ESC without a Program Card – A Useful Guide
Electronic speed controls (ESCs) are an essential component for radio-controlled models like drones, cars, helicopters, and boats. While most ESCs come pre-programmed, learning how to configure settings yourself without a separate programming card or box offers more flexibility and customization. This guide covers effective methods for programming ESCs using just a simple microcontroller.
What is an ESC and Why Program It?
An electronic speed control regulates power from the battery to the motor based on throttle inputs. Programming allows customizing features:
- Timing advance – Improves efficiency and torque by aligning voltage pulses with the motor’s physical state.
- Brake settings – Configures how quickly the motor slows down when throttle is reduced. Important for cars/boats.
- Voltage cutoff – Prevents over-discharging lithium batteries to avoid damage. Can be lowered to maximize run time.
- Acceleration profile – Allows smoother application of power and minimizing abrupt surges on throttle punch.
- PWM frequency – Lower frequencies offer quieter operation. Higher frequencies allow tighter performance.
- ** Factory resets** – Restores default settings if too many adjustments have degraded performance.
Programming requires connecting directly to an ESC’s circuitry, as described in the following sections.
Electronic Speed Control Circuit Basics
To understand ESC programming, a quick overview of how ESCs function:
- A microcontroller generates rapid digital pulses of power using PWM (pulse width modulation) to the motor.
- Varying pulse duration smoothly controls motor speed and direction. Wider pulses generate more power.
- The receiver provides the throttle inputs that tell the microcontroller what PWM signals to produce.
- MOSFETs switch the motor circuit on and off rapidly according to the pulses.
- Capacitors smooth out noise generated through rapid switching.
- BEC regulators provide clean low voltage power for the microcontroller and receiver.
Programming requires tapping directly into the microcontroller to adjust settings stored in its memory.
Programming Methods without a Card
To program an ESC without a dedicated programming card:
Using an Arduino
- Connect the ESC signal pin to an Arduino digital pin capable of PWM output.
- Connect the ESC ground pin to the Arduino ground.
- Configure the Arduino pin as an output and cycle the pin LOW/HIGH a few times to initialize the ESC.
- Pulse the PWM pin at 1ms neutral, 2ms maximum, then 1ms minimum as calibration signals.
- Send programming commands using timed PWM pulse sequences referenced from your ESC’s manual.
- Disconnect the Arduino when done and reconnect the ESC to your model’s components.
Using a Micro Battery Eliminator Circuit (BEC)
- Connect the positive and negative terminals of a small 3A hobby BEC to the ESC power pins. This will provide clean power for programming.
- Connect the signal pin on the BEC to the ESC signal input as you normally would from the receiver throttle channel.
- Use your radio system to provide remote throttle signals. Move the controls to max, center, then min to initialize.
- With your model powered off, hold full throttle on the transmitter and power up the BEC to put the ESC in program mode.
- Input programming throttle pulses according to the ESC’s documentation.
- Disconnect the BEC when complete and reconnect the battery and throttle normally.
Wiring for Programming
To connect an ESC for programming, locate the correct pins:
- Signal – Typically orange or yellow, provides the control pulse input that sets motor power. Connect this to your programming device.
- Power – Red positive (+) and black negative (-) wires. Connect a BEC or batteries rated for your ESC’s max amps.
- Ground – Brown or blue. Common ground between components helps signals transmit cleanly.
- Sense – A small yellow “sense” wire on some ESCs used for precise monitoring of low resistance. Can often be left disconnected.
- BEC – Thin red and black wires provide 5V or 9V power in some ESCs. Leave unconnected.
Double check your pins assignment against diagrams if color coding differs. Use sufficiently sized wire leads or bullet connectors.
Troubleshooting Programming Issues
If programming an ESC fails, check:
- Throttle calibration – Perform the full max/center/min throttle range initialization first. Skipping this can prevent program mode from engaging.
- Program sequence – Slowly step through the programming input sequence bit-by-bit. Rushing can cause the ESC to miss pulses. Refer to guides specific to your model’s ESC brand.
- Power connections – Use a BEC if possible that can provide sufficient constant current for the ESC’s demand. Weak batteries may brownout during programming.
- Pin connections – Ensure you have signal connected to an Arduino PWM pin or BEC signal, not just I/O. Check grounds are common.
- ESC age – Old or extensively used ESCs may not reliably enter programming anymore. Binding issues can develop on worn units.
In most cases, programming without a card just requires very deliberate and clean input timings along with adequate stable power for the ESC circuits.
Programming Key Settings
While parameters differ across ESC models, common adjustable options include:
Timing Advance
- Low timing delivers safer operation. Begin with 0° advance and incrementally increase to avoid immediate full power surges.
- Medium advance around 15° provides a good balance of power and efficiency for many motors.
- High timing near 30° maximizes torque but increases heat and risk of demagnetization or esc damage. Use cooling.
Brake Settings
- Minimal braking provides gentle coast down with little resistance. Useful for boats or high speed vehicles.
- Linear/proportional braking increases drag proportional to throttle reduction. Provides even controllable deceleration.
- Maximum braking enables immediate aggressive stops by generating high resistance when throttle released. Locks up wheels of ground vehicles.
Low Voltage Cutoff
- 2.8V per LiPo cell is a standard balance between runtime and battery life. Allows 80-90% discharge with little damage.
- 3.0-3.2V is a conservative threshold protecting packs from excess drain but sacrificing some run time.
- 2.5V cutoff will utilize nearly full capacity but risks over-discharging cells and battery damage over many cycles.
PWM Switching Frequency
- 8-16kHz offers the quietest and coolest operation but lower performance. Use for scale realism and boating.
- 24-32kHz gives a good blend of efficiency and low noise for general use in cars and aircraft.
- 48kHz+ allows extremely crisp and tight control of multirotors but with audible whine. Use for racing drones.
Restore Factory Default
- Resets all settings in case performance issues arise. Good to get back to a known safe baseline configuration.
Make small incremental adjustments to settings and test thoroughly to avoid damage from excessive modifications.
Safety Tips for ESC Programming
Take these precautions when working with ESCs outside models:
- Always disconnect propellers/pinions when bench testing motors and ESCs to avoid injuries.
- Secure the motor in place so it cannot spin freely and wander off the bench if powered.
- Keep flammable objects away and have a fire extinguisher on hand.
- Wear eye protection in case of debris thrown from a free-spinning motor.
- Avoid shorting battery connections which can quickly overheat and damage cells or ESCs.
- Never apply input power backwards to an ESC or connect batteries with reversed polarity.
- Limit runs to brief tests. Do not run motors at high power for prolonged periods without airflow cooling.
Take your time and program carefully. Rushing through the process risks hardware damage or safety hazards.
Advanced Programming Features
Beyond basics, advanced ESCs support extra capabilities:
- PWM Dithering – Slightly varies PWM frequency to spread noise across a wider spectrum for quieter motors.
- Battery Type – Optimizes cutoff voltages and charging parameters for cell count and chemistry like LiPo vs. NiMh.
- Oneshot125 – Special 125Hz PWM signal for upgrading older ESCs to support high-resolution modern digital protocols.
- Governor Mode – Maintains consistent headspeed on helicopters regardless of battery voltage sag or load changes.
- RPM limits – Restricts maximum RPM to control power and noise. Useful for preventing flywheel explosions on high kV motors.
- Temperature limits – Progressively lower output as temperature thresholds are exceeded to prevent ESC overheating damage.
- Current limits – Limit maximum current draw to prevent excess torque that can strip or break gears.
Check your ESC manual to see which advanced programming options your model supports.
Alternatives to Reprogramming ESCs
If lacking the equipment for direct programming, other options exist to change settings:
- Some transmitter systems allow accessing ESC menus through the interface when bound. Limited to adjusting basic options.
- Bluetooth program boxes connect wirelessly to supported ESCs to adjust settings conveniently.
- PC USB link interfaces paired with configuration apps offer full tuning and monitoring for newer ESCs.
- Smartphone apps connected over Bluetooth give touch based wireless control of settings for connected ESCs.
- Some ESCs support field firmware flashing to upgrade to newer feature sets.
For quick access to basic parameters, transmitter-based menus offer a handy wireless method. But direct programming remains the most flexible approach.
Upgrading to ESCs with Modern Features
As an alternative to reprogramming old ESCs, consider upgrades offering contemporary benefits:
Sensorless ESCs
- Use back EMF sensing instead of a sensor for good rpm control without complex wiring.
FOC ESCs
- Provide ultra smooth sensored Field Oriented Control for quite and precise motors. Ideal for drones and RC cars.
Program Card Compatibility
- Allow easy programming by dedicated programming cards and boxes via onboard ports.
Smartphone App Integration
- Enable monitoring and tuningESC parameters right from a mobile app over Bluetooth.
Anti-Spark Circuits
- Gradually increase output to avoid high current spikes that can damage brushless motors at startup.
High Voltage Ratings
- Support latest battery technologies like 6S+ LiPos for very high output power.
For demanding applications, purchasing a modern high-end ESC is preferable over re-configuring older ESCs that may lack capabilities.
Conclusion
Learning to program ESCs without dedicated programming hardware unlocks deeper customization and control. Follow the connection fundamentals, input the proper sequences referenced from your ESC’s manual, and take precautions to avoid hazards. While not overly complex, pay close attention to detail as rushing through programming procedures can cause issues. With some practice, you can tune your ESCs precisely to match your motors, models and performance goals.
Frequently Asked Questions
Can I program an ESC without disconnecting it from the model?
It is not recommended to program an ESC while still wired into the aircraft/vehicle. Always disconnect from motors and batteries first for the cleanest power and signals.
Do I have to recalibrate the neutral point after programming an ESC?
Yes, it’s good practice to cycle the throttle minimum/maximum after reprogramming so the ESC relearns the travel ranges and neutral point according to your transmitter setup.
Can I damage an ESC by programming it incorrectly?
It’s unlikely incorrect inputs would directly damage an ESC’s electronics. But improperly calibrated settings like timing or voltage could certainly damage the connected motor if not tested carefully.
How do I know which programmable parameters my ESC supports?
Consult the specifications or manual provided by the ESC manufacturer to verify which settings your particular ESC is capable of adjusting. Features vary widely across different ESC models.
What causes an ESC’s motors to stutter or studder?
Stuttering motors can be caused by issues like improper calibration, overly low voltage cutoff thresholds depleting batteries prematurely, incorrect PWM frequency mismatches, and signal noise interfering with clean throttle inputs.
Why does my ESC shut off immediately when I apply throttle?
This is likely due to an overly aggressive low voltage cutoff being programmed. When loaded, the battery sags below the programmed threshold, triggering immediate shutdown. Increase the cutoff threshold slightly like 0.1V at a time to prevent.
Can I program an ESC if I don’t have the exact programming card for that model?
In some cases general programming cards for that ESC brand may work if the input protocols haven’t changed. But it’s always best to have the precise programming tool designed specifically for your ESC’s electronics.
Is it safe to program ESCs inside my home?
We recommend programming ESCs only in well ventilated outdoor areas. The high currents and risk of sparks could ignite dust or flammable materials if attempted indoors. Take all reasonable safety precautions.
How do I know if my ESC was programmed successfully?
After programming an ESC, perform bench tests confirming the changed parameters like timing advance, cutoff voltages, braking, etc. behave as expected when connected to a motor under controlled conditions.
Programming the Hobbywing ESC without Card
Programming the Hobbywing ESC without a program card is a straightforward process that can be done by following a few simple steps. The process involves using the ESC’s built-in programming features to adjust various settings, such as the running mode, brake force, and battery type, among others.
Here are the steps to program the Hobbywing ESC without a program card:
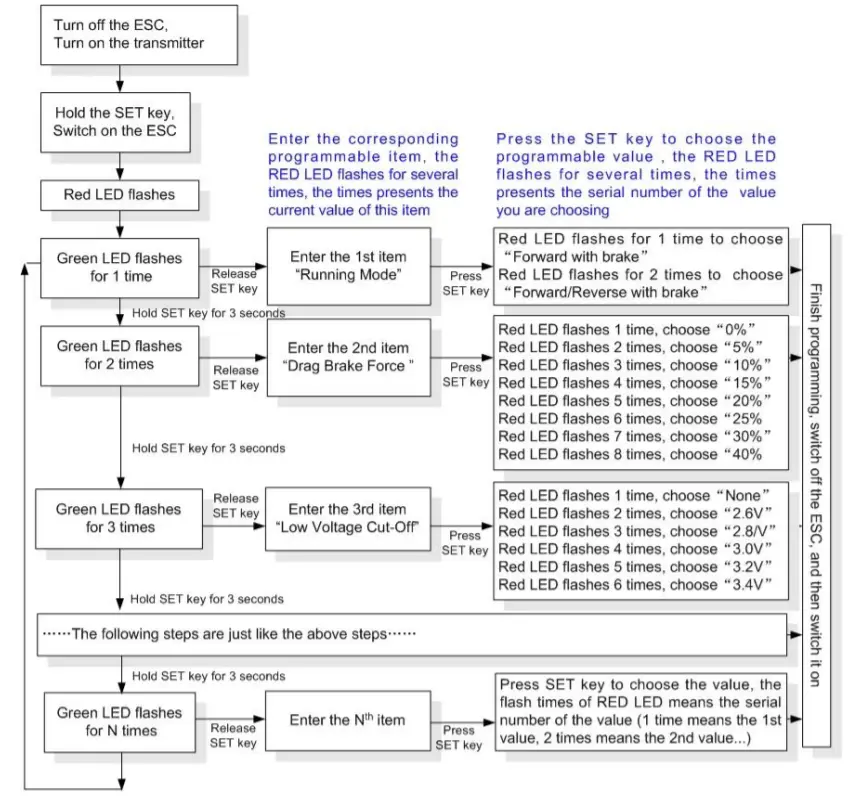
- Turn on the transmitter and receiver.
- Connect the battery to the ESC.
- Press and hold the “SET” button on the ESC until the LED flashes once and then release it.
- Use the throttle trigger on the transmitter to select the desired programmable item.
- Press the “SET” button to enter the selected programmable item.
- Use the throttle trigger to adjust the setting value.
- Press and hold the “SET” button to save the setting and exit the programming mode.
It’s important to note that the LED on the ESC will flash to indicate the current programmable item and the setting value. The number of flashes and the length of the pauses between them will vary depending on the selected item and value.
Furthermore, the user manual that comes with the ESC provides detailed information on the programmable items and their default settings. It’s recommended to consult the manual before making any changes to ensure that the ESC operates correctly and safely.
Testing the ESC
After programming the Hobbywing ESC without a card, the next step is to test the ESC to ensure it is working correctly. Here are the steps to follow when testing the ESC:
- Connect the ESC to the battery and motor.
- Turn on the transmitter and set the throttle to the lowest position.
- Turn on the ESC and wait for the initialization tone.
- Gradually increase the throttle and observe the motor’s response.
- If the motor spins in the wrong direction, swap any two motor wires to reverse the direction.
- If the motor does not spin or behaves erratically, check the connections and programming settings.
It is important to test the ESC in a safe environment and keep the vehicle stationary during testing. Always wear protective gear and keep your fingers away from the moving parts.
If the ESC passes the initial test, it is ready for use in your RC vehicle. However, it is recommended to perform a few more tests to ensure the ESC is functioning correctly:
- Check the temperature of the ESC during operation. If it gets too hot, reduce the load or adjust the programming settings.
- Test the ESC under different conditions, such as different battery voltages, motor loads, and terrain types.
- Monitor the battery voltage and ESC temperature during operation to ensure they stay within safe limits.
By following these testing procedures, you can ensure that your Hobbywing ESC is programmed correctly and functioning optimally, providing a smooth and reliable driving experience for your RC vehicle.
- In the program process, the motor will emit “Beep” tone at the same time when the LED is flashing.
- If the “N” is bigger than the number “5”, we use a long time flash and long “Beep—” tone to represent
- “5”, so it is easy to identify the items of the big number.
- For example, if the LED flashes as the following:
- “A long time flash + a short time flash” (Motor sounds “Beep—Beep”) = the No. 6 item
- “A long time flash + 2 short time flash” (Motor sounds “Beep—BeepBeep”) = the No. 7 item
- “A long time flash + 3 short time flash” (Motor sounds “Beep—BeepBeepBeep”) = the No. 8 item
- ……
- And so on.
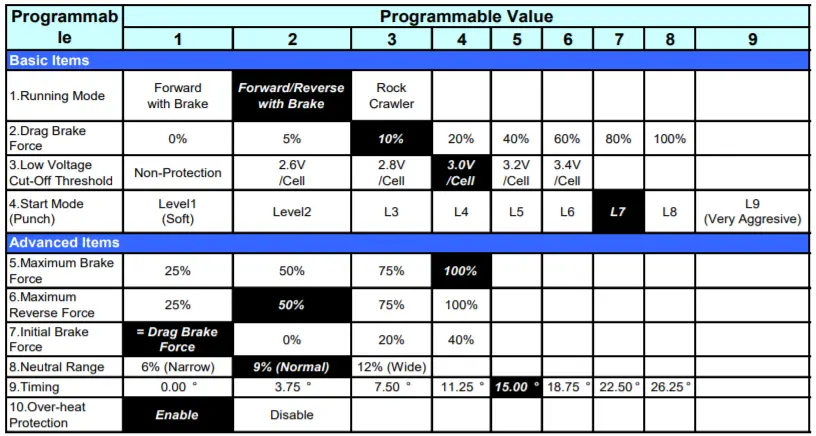
- Programmable Values
3.1.Running Mode: With “Forward with Brake” mode, the car can go forward and brake, but cannot go backward,
this mode is suitable for competition; “Forward/Reverse with Brake” mode provides backward function, which is
suitable for training. The “Rock Crawler” mode is only used for rock crawler.
Note: “Forward/Reverse with Brake” mode uses “Double-Click” method to make the car go backward.
When you move the throttle stick from forward zone to backward zone for the first time, the ESC begins to brake
the motor, the motor speeds down but it is still running, not completely stopped, so the backward action is NOT
happened now. When the throttle stick is moved to the backward zone again (The 2
nd
“click”), if the motor speed is
slowed down to zero (i.e. stopped), the backward action will be occurred. The “Double-Click” method can prevent
mistakenly reverse when the brake function is frequently used in steering.
With “Rock Crawler” mode, the reverse action will be happened immediately when the throttle stick is moved to
backward zone. Please set the “Drag Brake Force” to 100% if you choose the “Rock Crawler” mode.
3.2.Drag Brake Force: Set the amount of drag brake applied at neutral throttle to simulate the slight braking effect
of a neutral brushed motor while coasting.
3.3.Low Voltage Cut-Off: The function is mainly to prevent the lithium battery pack from over discharging. When
using lithium battery pack, please set the suitable value for low-voltage protection as your like. The ESC monitors
the battery’s voltage at any time, if the voltage is lower than the threshold, the output power will be reduced to 50%
in 2 seconds. Please drive and stop the car at the side of the racing track as soon as possible, the ESC will
completely cut off the output power in 10 seconds.
3.4.Start Mode (Also called “Punch”): Select from “Level1 (Soft)” to “Level 9 (Very aggressive)” start mode as
your like. Please note that if you choose “Level 7” to “Level 9”, you’d better use good quality battery pack with
powerful discharge ability, otherwise these modes cannot get the bursting start effect as you want. If the motor
cannot run smoothly (the motor is trembling), it may caused by the weak discharge ability of the battery pack,
please choose a better battery or increase the gear rate.
3.5.Maximum Brake Force: The ESC provides proportional brake function. The brake force is related to the
position of the throttle stick. Maximum brake force refers to the force when the throttle stick is located at the top
point of the backward zone. A very large brake force can shorten the brake time, but it may damage the gears.
3.6.Maximum Reverse Force: Sets how much power will be applied in the reverse direction. Different value
makes different reverse speed.
3.7.Initial Brake Force: It is also called “minimum brake force”, and it refers to the force when the throttle stick is
located at the initial position of the backward zone. The default value is equal to the drag brake force, so the brake
effect can be very smooth.
How to Program a Goolrc ESC without Card
Program a Goolrc ESC Without Card: A Step-by-Step Guide
Programming an Electronic Speed Controller (ESC) can be a daunting task, especially if you don’t have a program card. However, with a little patience and the right steps, it’s possible to program your Goolrc ESC without a card. This article will guide you through the process of programming your Goolrc ESC without a program card in 2023.
First and foremost, it’s important to ensure that you have a battery that can connect to the ESC. Once you’ve secured the power connection, check to see if the LED lights are working. The lights indicate whether the circuit has received power or not. If the lights are working, you can proceed with the programming process.
There are several steps involved in programming your Goolrc ESC without a program card. These include powering up the ESC, entering programming mode, selecting the desired settings, and saving your changes. By following the steps outlined in this article, you’ll be able to program your Goolrc ESC without a program card and get your RC vehicle up and running in no time.
Understanding Goolrc ESC
Goolrc ESC is an electronic speed control system designed for remote-controlled vehicles such as cars, trucks, boats, and airplanes. It regulates the speed of the motor and controls the direction of the vehicle. It is an essential component of any remote-controlled vehicle, and understanding how it works is crucial for programming it effectively.
Goolrc ESCs come in different models and sizes, ranging from small 10A ESCs for small vehicles to large 120A ESCs for heavy-duty vehicles. They are compatible with various types of batteries, including LiPo, NiMH, and NiCd.
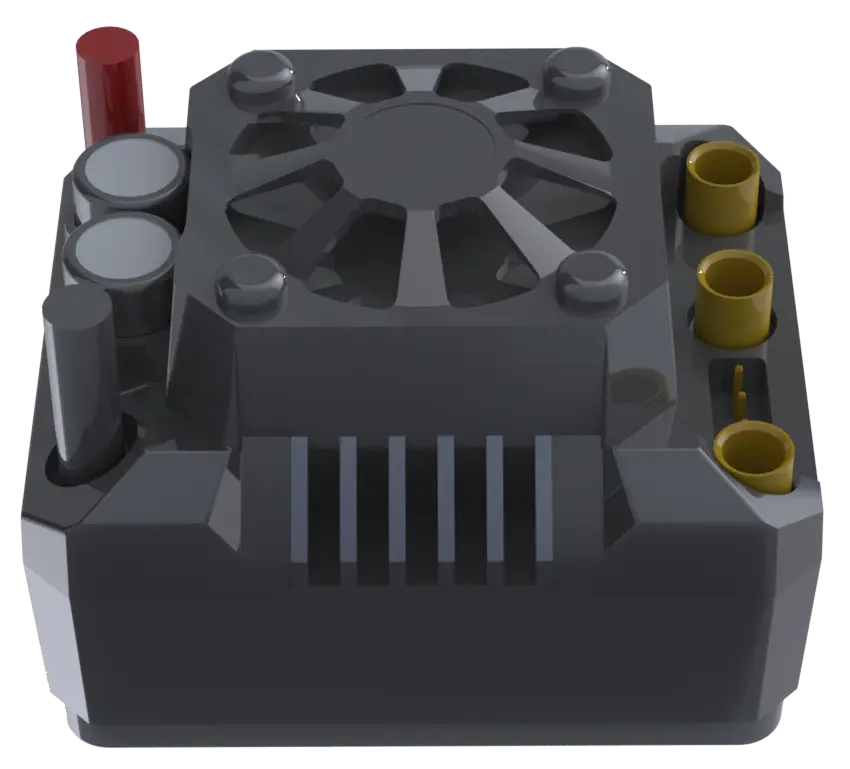
Goolrc ESCs consist of three main parts: the power input, the motor output, and the control input. The power input connects to the battery, while the motor output connects to the motor. The control input connects to the receiver, which receives signals from the transmitter.
Goolrc ESCs have several features and settings that can be programmed to customize the performance of the vehicle. These include throttle range, brake force, motor timing, and battery type. Programming these settings can improve the performance and efficiency of the vehicle.
Preparation and Tools Required
Before programming a Goolrc ESC without a card, it is important to have the necessary tools and equipment. The following tools are required:
- A Goolrc ESC
- A compatible remote control transmitter
- A battery pack or power source
- A computer with internet access (optional)
- A USB programming cable (optional)
It is important to make sure that the remote control transmitter is compatible with the Goolrc ESC. If the transmitter is not compatible, it may not be possible to program the ESC without a card.
It is also important to ensure that the battery pack or power source is fully charged before beginning the programming process. This will help to ensure that the ESC does not shut off unexpectedly during programming.
Finally, if using a computer to program the ESC, it is important to download the necessary software and drivers from the Goolrc website. The USB programming cable may also be required to connect the ESC to the computer.
Step-by-Step Guide to Programming Goolrc ESC without Card
Programming a Goolrc ESC without a card can be a bit tricky, but it is still possible. Here is a step-by-step guide on how to do it:
- Connect the battery to the ESC. Make sure that the LED lights on the ESC turn on.
- Press and hold the setup button on the ESC until the LED light flashes once.
- Release the setup button, and then immediately press it again and hold it until the LED light flashes twice.
- Release the setup button again, and then immediately press it again and hold it until the LED light flashes three times.
- Release the setup button one more time, and then immediately press and hold it until the LED light flashes four times.
- At this point, the ESC is in programming mode. You can now use the throttle stick on your transmitter to navigate through the different programming options.
- When you find the option you want to change, move the throttle stick to the appropriate position to select that option.
- Repeat this process until all of the settings are programmed to your liking.
- Once you are finished programming, turn off the ESC and disconnect the battery.
It is important to note that the exact programming options and procedures may vary depending on the specific model of Goolrc ESC that you are using. Be sure to consult the user manual for your ESC to ensure that you are following the correct steps.
Additionally, it is always a good idea to double-check your programming settings before using your RC vehicle. This can help to prevent any unexpected behavior or accidents.
Testing the ESC after Programming
After programming the Goolrc ESC without a card, it is important to test the ESC to ensure that it is properly programmed and functioning correctly.
One way to test the ESC is to connect it to a motor and a battery and perform a bench test. During the bench test, observe the motor’s rotation and listen for any unusual sounds. If the motor rotates smoothly and there are no unusual sounds, the ESC is likely programmed correctly.
Another way to test the ESC is to perform a field test. During the field test, the ESC should be connected to the motor and battery and the system should be placed in a safe, open area. The throttle should be gradually increased to observe the motor’s performance. If the motor responds smoothly and there are no unusual sounds or behaviors, the ESC has been successfully programmed.
It is important to note that if any issues arise during the testing process, the ESC should be immediately disconnected from the battery to prevent damage to the motor or ESC. The programming process should then be repeated to ensure that the ESC is properly programmed.
Overall, testing the ESC after programming is a crucial step to ensure that the system is functioning correctly and to prevent any potential damage to the motor or ESC. By following the proper testing procedures, users can ensure that their Goolrc ESC is programmed correctly and ready for use in their RC vehicle.
Conclusion
Programming a Goolrc ESC without a card can be a daunting task, especially for beginners. However, with the right tools and knowledge, it can be done successfully. It is important to have a user manual that comes with the box or can be downloaded from the manufacturer’s website. This manual will have a specific section that outlines the ESC’s programming options.
One of the easiest ways to program a Goolrc ESC without a card is by using a servo lead extension from the program box to the ESC. This method has worked for many users, and it eliminates the need to purchase a program card. Another option is to use a USB to mini USB cable from the PC to the program box. However, this method may not work for everyone.
It is also important to note that the Goolrc ESC may have different programming options than other ESCs on the market. Therefore, it is crucial to read the user manual carefully and follow the instructions provided by the manufacturer. If you encounter any issues or have any questions, it is recommended to contact the manufacturer for assistance.
how to program castle esc without card
how to program spectrum esc without card
how to program traxxas esc without program card