

A typical Tinywhoop micro FPV drone with ducted propellers and compact design Oscar Liang
When entering the world of FPV (First Person View) drones, many beginners find themselves overwhelmed by complex options and technical jargon. The Tinywhoop class offers an ideal entry point—affordable, durable, and perfect for learning the fundamentals. This guide walks you through building a complete Tinywhoop micro drone for around $130, with minimal soldering required.
Table of Contents
Why Start With a Tinywhoop?
Tinywhoops represent the perfect gateway into FPV flying for several compelling reasons:
Cost-Effective Learning: Unlike larger 3.5-inch or 5-inch drones that can cost $300+ to build, a complete Tinywhoop setup costs around $130-150.
Safety First: These micro-sized drones weigh under 30 grams and feature propeller guards, making them safe to fly indoors and around people.
Durability: Their lightweight design and protected props mean they survive crashes that would destroy larger drones.
Skill Development: Flying a Tinywhoop teaches the same core flight mechanics as larger drones.
Maintenance Simplicity: Repairs are straightforward and inexpensive compared to larger builds.
Year-Round Flying: When weather prevents outdoor flying, Tinywhoops let you maintain skills indoors.

Tinywhoop micro drone racing events have become popular indoor competitions Cradle of Aviation Museum
Component Overview: What You’ll Need
Let’s break down the essential components for our $130 Tinywhoop build:

All components needed for a complete Tinywhoop build Oscar Liang
Frame
- Meteor 65 Loop Frame – A lightweight, durable frame designed specifically for micro drones
Flight Controller
- T-Motor F4 6A 1S AIO (All-In-One) with built-in ELRS receiver – $50-80 depending on availability
Motors
- Happy Model 802S Motors – Four brushless motors with plug connectors (no soldering required)
Camera
- Tiny Pinch Cam – A compact FPV camera ($19) with easy mounting options
Camera Mount
- Pinch Cam Canopy – Custom design for secure camera mounting ($5-10)
Propellers
- Happy Model 31mm Props – Standard micro drone propellers
Additional Items Needed
- Soldering iron with fine tip
- 63/37 solder
- Flux (preferably MG Chemicals in syringe applicator)
- Isopropyl alcohol (99%)
- Small screwdriver set
- E6000 adhesive
- Small toothbrush for cleaning
Step-by-Step Build Guide
1. Motor Installation

Installing motors on the Tinywhoop frame Oscar Liang
Begin by installing the motors into the frame:
- Identify the four motor mounting positions on the Meteor 65 frame
- Align each Happy Model 802S motor with its mounting holes
- Select the appropriate-length screws (typically included with motors)
- Secure each motor with two screws—no need for all four per motor to save weight
- Ensure screws don’t protrude into the motor windings
- Avoid over-tightening as this can strip the delicate plastic threads
Pro Tip: Use only enough pressure to secure the motors without stripping the threads. Motor mounting screws should never touch the motor windings.
2. Flight Controller Preparation

Soldering the camera connections to the flight controller Oscar Liang
Before mounting the flight controller, we need to solder the camera connections:
- Identify the three camera connection pads on the flight controller:
- Camera signal (CAM)
- 5V power (5VT)
- Ground (GND)
- Prepare the camera wires:
- Yellow wire = Camera signal
- Red wire = 5V power
- Black wire = Ground
- Trim wires to appropriate length
- Strip just 1-2mm of insulation from each wire
- Apply a small amount of solder to tin the exposed copper
- Soldering process:
- Apply flux to each pad
- Heat each pad briefly with your iron
- Apply a small amount of solder to each pad
- Hold the tinned wire to the corresponding pad
- Briefly touch with the soldering iron until the solder flows
- Start with ground (furthest pad), then power, then signal
Pro Tip: “Flux is to soldering what cocaine was to the 80s” – apply it liberally before each connection. It dramatically improves solder flow and connection quality.
3. Quality Check
After soldering:
- Clean the board thoroughly with isopropyl alcohol and a toothbrush
- Check for solder bridges or “balls” that could cause shorts
- Use a multimeter to check for continuity between pads that shouldn’t be connected
- Verify each solder joint is secure with a gentle tug test
This step-by-step inspection after soldering each component saves significant troubleshooting time later.
4. Flight Controller Installation
Now that the camera is connected, install the flight controller into the frame:
- Orient the flight controller correctly in the frame
- Look for an arrow indicating the front direction
- If no arrow is present, the USB port typically faces the rear
- If the USB port contacts the frame, rotate the board as needed
- Insert the flight controller into the frame’s mounting position
- Use the included screws and rubber dampeners
- Tighten just until the rubber dampeners begin to compress slightly
Note: Proper orientation is crucial for the gyroscope to function correctly. The front of the flight controller must align with the front of the frame.
5. Motor Connection
With the AIO flight controller mounted, connect the motors:
- Twist each set of motor wires for better wire management and to reduce electromagnetic interference
- Plug each motor connector into its corresponding socket on the flight controller
- Tuck excess wire neatly around the sides of the frame
- Ensure no wires contact the gyroscope (center chip on the flight controller)
Pro Tip: Twisted wires have more tension and stay in place better, creating a cleaner build with less chance of wires getting caught in propellers.
6. Antenna Installation
The ELRS receiver antenna needs proper installation for optimal range:
- Locate the antenna connector on the flight controller
- Gently attach the antenna by twisting it onto the connector
- Position the antenna along the back of the frame, extending upward
- Apply a small dab of E6000 adhesive or liquid electrical tape to secure the antenna
- Allow adhesive to dry for 10-15 minutes before handling
Warning: Never power on your drone without the antenna connected, as this can damage the receiver.
7. Camera Mount Installation

Installing the camera and canopy on the Tinywhoop Oscar Liang
Now we’ll mount the camera and its protective canopy:
- Remove the three front screws from the flight controller
- Align the camera canopy with the screw holes
- Replace and tighten the screws, securing the canopy
- Position the camera in the canopy’s mounting area
- Apply a small dab of E6000 adhesive to secure the camera
- Ensure the camera is level and centered in the frame
The E6000 adhesive provides a secure yet removable mounting solution. Unlike zip ties or tape, it won’t come loose during crashes but can be removed when needed.
8. Final Assembly
Complete the build with these final steps:
- Double-check all connections
- Verify no loose wires could contact moving parts
- Ensure all screws are properly tightened
- Install propellers (direction matters—match props to motor rotation)

A completed Tinywhoop micro FPV drone ready to fly Unmanned Tech Blog
Configuration Basics
After physical assembly, your Tinywhoop needs proper software configuration:

Betaflight configurator settings screen for Tinywhoop setup Oscar Liang
Betaflight Setup
- Download and install Betaflight Configurator
- Connect your drone via USB
- Update to the latest firmware if needed
- Configure ELRS receiver settings
- Set up proper UART connections for the camera
- Calibrate the accelerometer
- Set up proper arm switches and flight modes
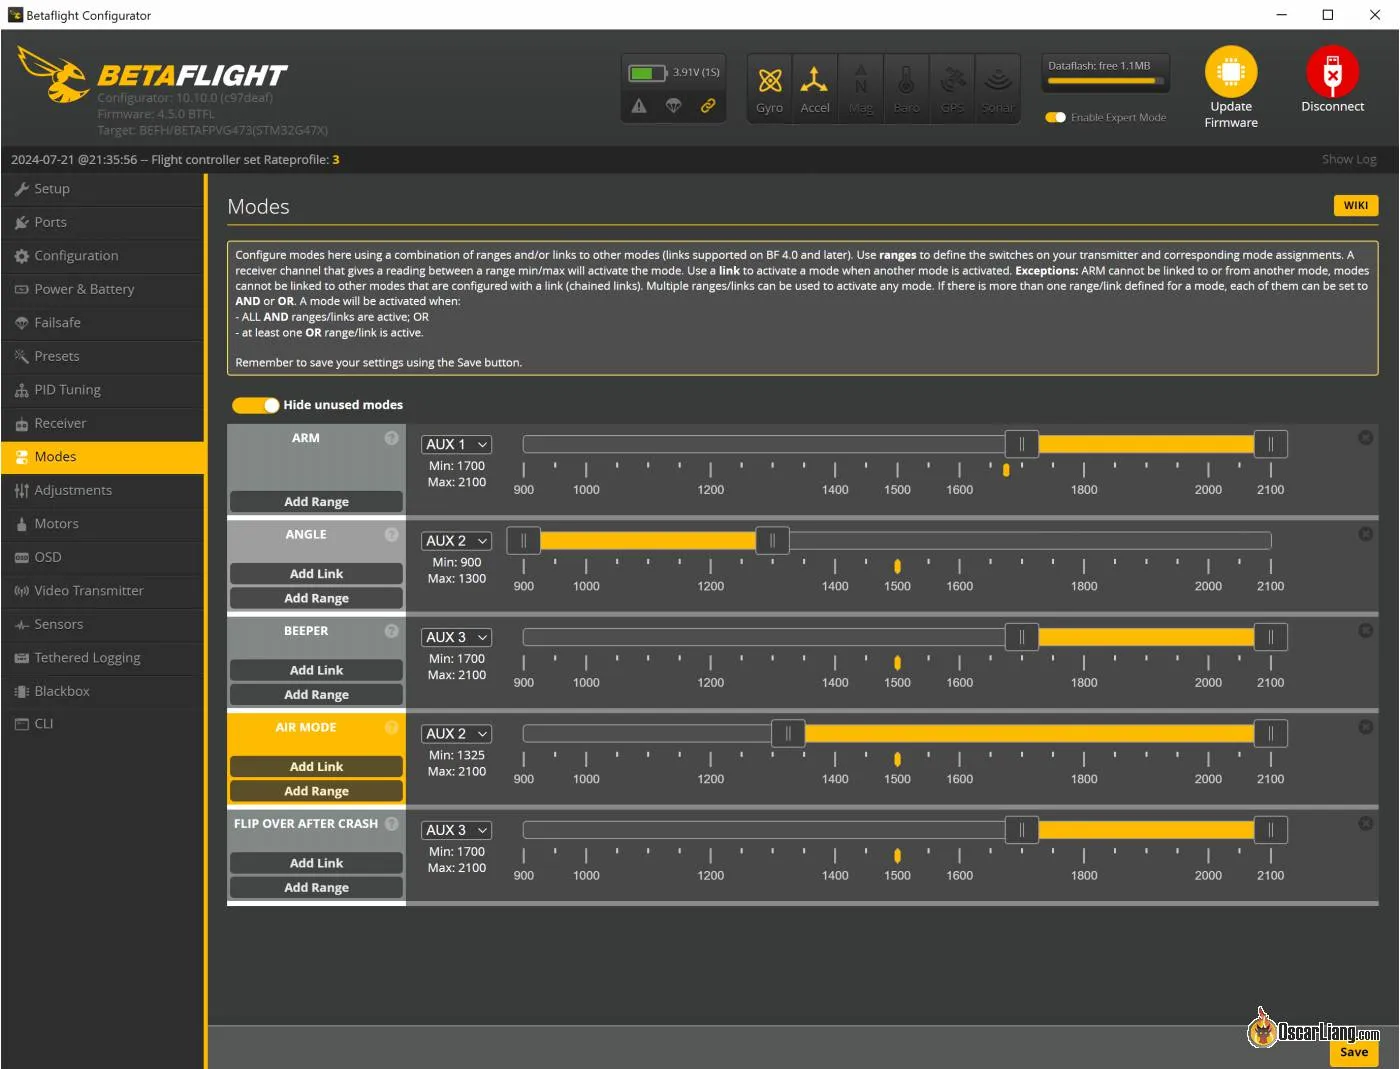
Setting up flight modes in Betaflight for a Tinywhoop Oscar Liang
Radio Setup
- Ensure your radio has ELRS support
- Bind the receiver to your transmitter
- Set up basic switches for arm, flight mode, and beeper
- Configure rates to your preference (start conservative)
Video Setup
- Configure video transmitter channel and power
- Test video feed with your goggles
- Adjust camera angle for comfortable flying
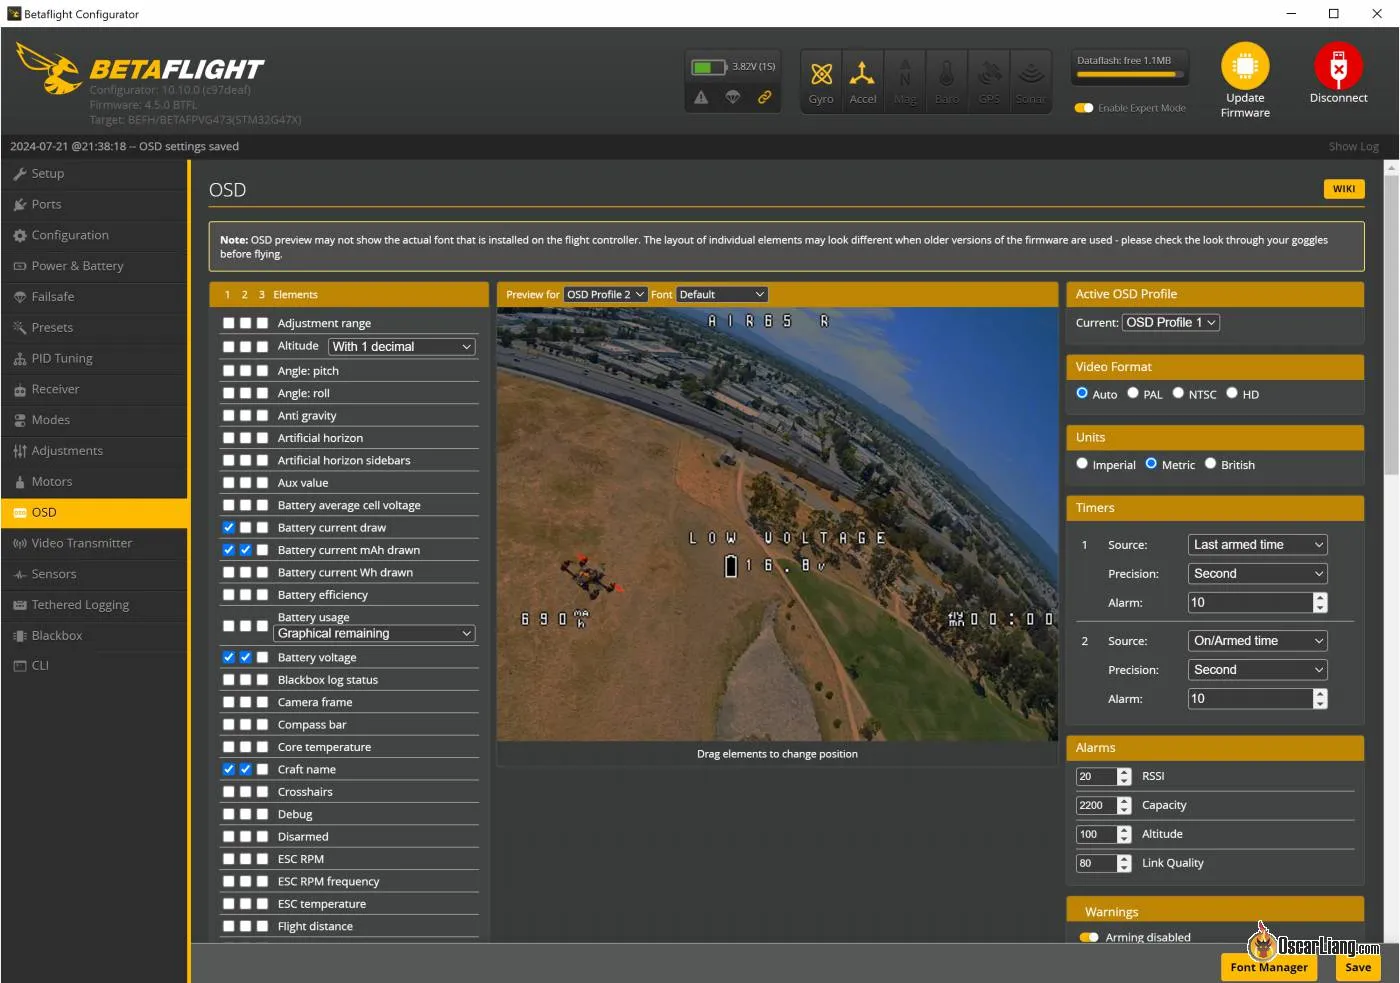
Configuring the on-screen display for your FPV feed Oscar Liang
Flying Tips for Beginners
Starting Out:
- Find Space: Start in a large, open indoor area free of obstacles
- Hover Practice: Master hovering in place before attempting movement
- Line of Sight: Initially practice flying with the drone visible to you
- Altitude Control: Focus on maintaining consistent altitude
- Slow Movements: Use gentle stick inputs while learning
Progression:
- Figure 8s: Practice simple patterns to build coordination
- FPV Transition: Once comfortable, transition to flying via the camera feed
- Precision Landing: Work on landing accurately on specified targets
- Battery Management: Learn to feel when the battery is getting low through flight characteristics
Common Mistakes:
- Overcorrection: Beginners often make large stick movements when small ones would suffice
- Disorientation: Losing track of which direction the drone is facing
- Panic Reactions: Freezing up or making erratic movements during unexpected situations
- Battery Ignorance: Flying until complete battery failure, which can damage components
Maintenance and Troubleshooting
Regular Maintenance:
- Motor Inspection: Check motors for hair or debris after flights
- Prop Condition: Inspect propellers for damage and replace as needed
- Battery Care: Store batteries at storage voltage (3.8V for 1S)
- Connection Check: Periodically check all connections for looseness
Common Issues:
- Drift Problems: Usually related to accelerometer calibration or gyro issues
- Motor Failures: Often caused by debris or crash damage
- Reception Issues: Typically related to antenna positioning
- Flight Controller Resets: Usually a power delivery problem
Upgrades to Consider:
- Better Batteries: Upgrading to higher-quality 1S batteries improves flight time
- Canopy Options: Different camera angles for different flying styles
- Propeller Variations: Different props can change flight characteristics
- Motor Upgrades: Higher-quality motors provide better efficiency and power
Advanced Techniques
Once you’ve mastered the basics, consider these advanced techniques:
Acro Mode:
Flying in acrobatic mode removes self-leveling assistance, giving you complete control over the drone’s orientation. Start practicing in a simulator before attempting with your actual Tinywhoop.
Power Loops:
The power loop is a foundational FPV trick where you fly forward, pull back to loop over yourself, and continue forward. Tinywhoops have limited power for this maneuver, but it’s possible with practice.
Proximity Flying:
Flying close to objects requires precise control. Begin with large, stationary objects and gradually work toward more challenging obstacles.
Battery Management:
Advanced pilots learn to extract maximum performance throughout the battery discharge curve, adjusting their flying style as voltage drops.

A Tinywhoop with upgraded components for better performance Oscar Liang
Building Your Tinywhoop Community
The FPV community is incredibly supportive of newcomers. Consider:
- Local Groups: Search for local drone flying groups on social media
- Online Forums: Join Tinywhoop-specific discussion forums
- Race Events: Many areas have micro drone racing events that welcome beginners
- Content Creation: Share your progress videos to connect with others
Cost Optimization
While our build costs approximately $130, here are ways to reduce costs:
- Camera Options: Less expensive cameras ($12-14) work well for beginners
- Flight Controller Alternatives: Watch for sales or consider previous generation models
- Bundle Deals: Many vendors offer component bundles at discounted prices
- DIY Options: Making your own camera mount can save $5-10

Different Tinywhoop builds with varying components and weights Oscar Liang
Safety and Regulations
Even with micro drones, being aware of regulations is important:
- Indoor Flying: Tinywhoops are primarily designed for indoor use where regulations are minimal
- Weight Advantages: Most Tinywhoops fall under the weight requirement for registration
- Property Respect: Always get permission before flying on others’ property
- Battery Safety: Follow proper charging and storage procedures to prevent fire hazards
The Learning Pathway
A Tinywhoop isn’t just a beginner drone—it’s the start of a progressive learning journey:
- Tinywhoop Phase: Master indoor flying and basic controls
- Micro Outdoor Phase: Move to slightly larger 2-3 inch drones for outdoor flying
- Freestyle Phase: Progress to 5-inch freestyle quads for aerial acrobatics
- Specialized Interests: Branch into racing, long-range, or cinematic flying
Many experienced pilots maintain their Tinywhoop even after moving to larger drones, as they offer unique flying experiences that larger crafts can’t provide.

A complete Tinywhoop setup including controller, goggles, and charging equipment Oscar Liang
FAQ Section
Q: How long will a battery last on a Tinywhoop?
A: Typical flight time is 3-5 minutes per battery, depending on your flying style and battery quality.
Q: Can I fly a Tinywhoop outdoors?
A: Yes, but only in very calm conditions. Even light breezes will make control difficult.
Q: Do I need a ham radio license to fly with ELRS?
A: In most regions, ELRS can be operated legally at lower power settings without a license, but check your local regulations.
Q: How far can I fly a Tinywhoop?
A: With ELRS, radio range typically exceeds 100 meters, but practical video range is usually limited to 30-50 meters.
Q: What’s the best beginner flight mode?
A: Start with “Angle” mode, which provides self-leveling assistance, before moving to more advanced modes.
Q: How do I know when to replace motors?
A: Motors should be replaced when you notice reduced performance, unusual noises, or visible damage to the bell or shaft.
Conclusion
Building your own Tinywhoop micro drone is an excellent introduction to the world of FPV flying. For approximately $130 and minimal soldering, you can create a highly capable indoor flyer that will teach you the fundamentals of drone building and piloting.
The skills you develop—from basic soldering to flight control—transfer directly to larger, more complex builds as your experience grows. Many pilots who began with humble Tinywhoops have progressed to competitive racing and professional aerial photography.
Remember that every expert pilot began as a beginner. The Tinywhoop community especially embraces newcomers, so don’t hesitate to ask questions and share your experiences as you embark on this exciting journey. Your first successful flight with a drone you built yourself is a uniquely satisfying experience that marks the beginning of countless hours of flying enjoyment.
Whether you’re looking for a winter hobby, an entry into drone racing, or simply a fun way to experience flight from a new perspective, a DIY Tinywhoop build represents the perfect starting point for your FPV adventure.